

A planning image should clarify a design, not sell a dream. If you’re preparing a residential application, plans and elevations show dimensions and layout, but they can be harder to interpret when a proposal changes the shape of a familiar home or its relationship with neighbouring buildings. That’s where architectural visualization for planning can help: it makes design intent easier to understand without replacing the technical information a planning application needs.
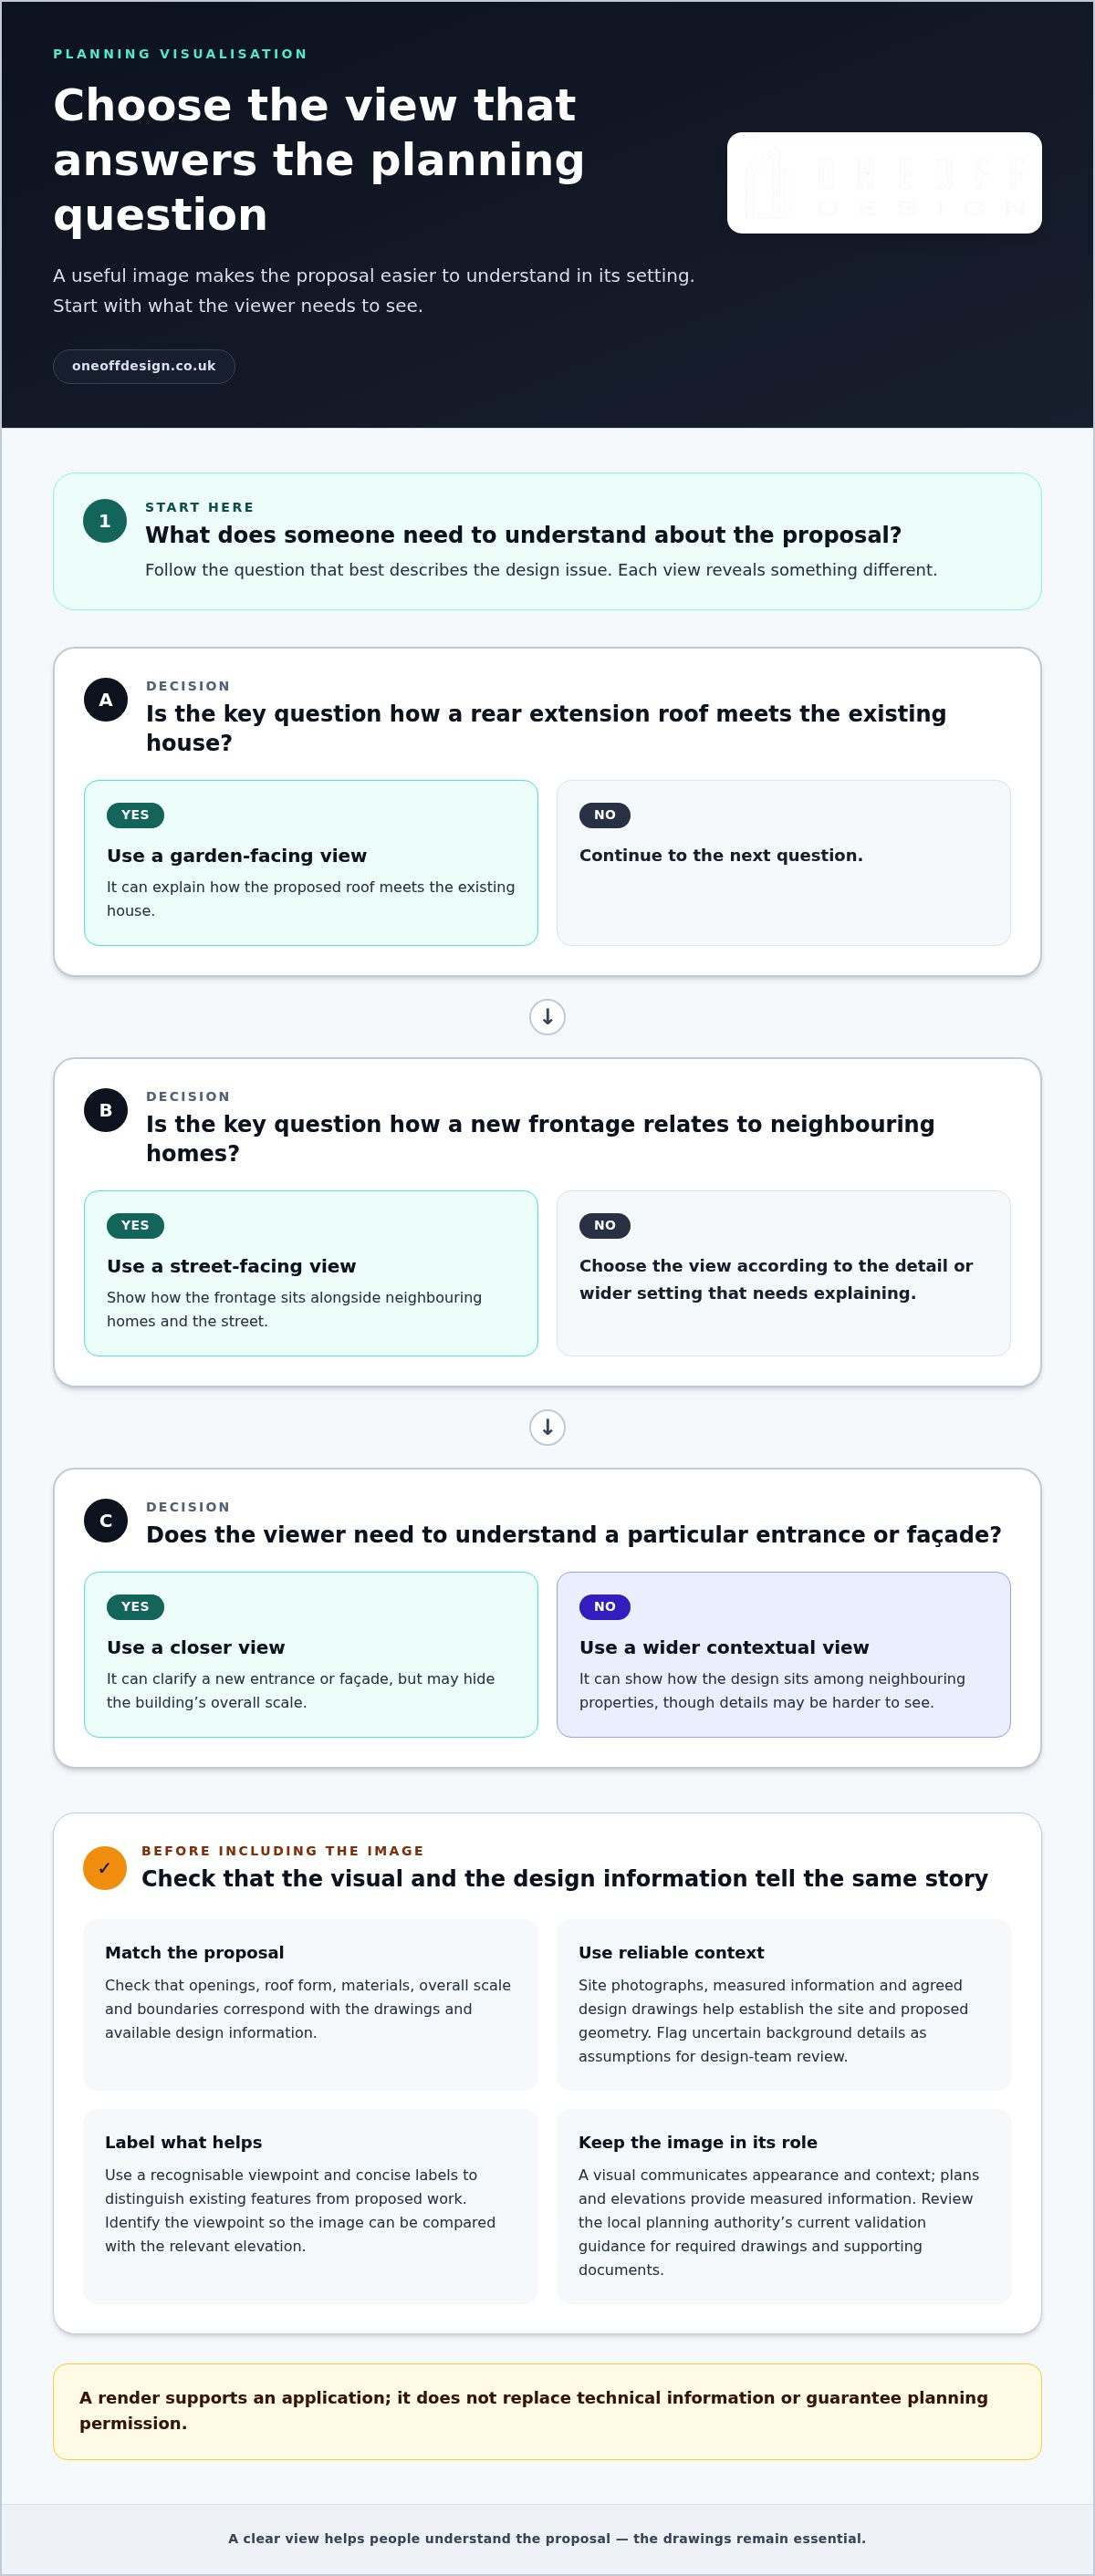
Which visuals are useful depends on the proposal, its setting and the information your local planning authority requires. A view of a rear extension from the garden, for example, may explain how its roof meets the existing house; a street-facing view may be more useful when the question is how a new frontage relates to neighbouring homes. Visuals support an application, but they don’t guarantee approval.
This guide explains the role of planning visualisation, how to choose a suitable format and what to check before including images in a submission. It also covers how visualisation can work alongside architectural design and CAD information, so each part of your application presents the same proposal.
Key Takeaways
- See how architectural visualisation for planning can make a proposal’s scale, form and setting easier to understand.
- Learn how viewpoint and site context affect whether a visual communicates the design clearly.
- Compare visual formats and match them to your project, audience and application context.
- Follow a practical preparation process, from defining the planning question to checking images against design information.
- Discover how bespoke visualisation can work with residential design and CAD to present a coherent proposal.
Why architectural visualisation can make a planning proposal easier to understand
Architectural visualisation illustrates a proposed design. It helps people picture what a scheme may look like, but it is not a planning decision. A view of an extension or new home can make its appearance and position easier to understand. The planning authority still assesses the application against relevant policies and evidence.
Plans and elevations communicate precise information such as layout, dimensions and external form. A visual adds another perspective. It can show how a new roofline sits beside neighbouring properties, how the building’s massing relates to the plot, or how proposed materials may appear against the existing house. Together, these materials give a fuller account of the design intent. A carefully prepared architectural visualization for planning should support the technical drawings, not compete with them.
Architectural illustration includes different ways to represent a design, from drawings to rendered views. Choose the format that helps someone understand the proposal in its setting, rather than one that simply makes it look polished.
What planning visuals help a homeowner communicate
A contextual view places a proposal within its site and shows its relationship with nearby buildings, boundaries and the street. This can help when a plan or elevation feels abstract to someone who doesn’t regularly read architectural drawings. Check that the view matches the design information: openings, roof form, materials and overall scale should correspond with the drawings.
Use a recognisable viewpoint and concise labels to help readers distinguish existing features from proposed work. If an image shows one side of a house, identify the viewpoint so it can be compared with the relevant elevation. The aim is not visual drama. It is a shared, credible understanding of what is proposed.
What a render cannot do for a planning application
An attractive image cannot guarantee planning permission, override planning policy or demonstrate every technical detail. A render can communicate appearance and context, but it does not provide the measured information found in plans, elevations or other application documents. Including one does not automatically make an application complete.
Requirements can vary by proposal and location. Before preparing a submission, review the relevant local planning authority’s current validation guidance to see which drawings and supporting documents are required. Keep every visual consistent with that material. When the image and drawings describe the same scheme, the presentation is clearer and more credible.
How architectural visualisation communicates design, scale and site context
A planning visual is only as useful as the information it represents. Camera position, visible surroundings and the relationship to site boundaries all affect how a proposal reads. A close view may clarify a new entrance or façade but hide the building’s overall scale. A wider view can show how the design sits among neighbouring properties, though details may be harder to see. Choose the viewpoint to answer a specific question about the proposal.
Context gives a planning visual meaning; viewpoint determines what that context reveals. This is central to architectural visualization for planning. An image should make the design easier to assess, not present it in isolation or hide features that affect how it relates to its setting.
Representing the proposal in its real surroundings
Start with reliable project information. Site photographs help establish visible features, while measured information and agreed design drawings provide a basis for the proposed geometry and position. These inputs help set a view that reflects the actual site rather than an idealised version of it.
Neighbouring buildings, boundaries, trees and changes in level can all affect how a viewer understands scale and fit. If background details are uncertain, identify them as assumptions for design-team review instead of presenting them as fact. This is particularly relevant in Cambridge, where the character and arrangement of surrounding buildings vary between residential settings. The same care applies across London, where the setting can change considerably from one street or borough to another.
Making scale and design choices legible
The model behind the visual should follow the same dimensions and geometry as the architectural design information. A roof that appears lower, an opening in a different position or an inaccurately shown boundary can undermine confidence in the image. The view and drawings need to describe the same proposal.
Materials can communicate design intent, but the image should not imply a confirmed product or finish if one has not been selected. Keep colours and surface treatments plausible and consistent with the available design information. Use annotations sparingly: label the viewpoint or identify existing and proposed elements when that improves understanding, without crowding the image or overstating a design feature.
These checks make the visual a coordinated part of the design process. Oneoff Design’s residential 3D visualisation can sit alongside architectural design and CAD information, helping communicate a project through views shaped around its specific context.
Which planning visualisation format suits your residential project?
Choose a format by starting with the question the image needs to answer. Is it about height, appearance from the street, or how a new space relates to the existing house? The most elaborate option isn’t automatically the most useful. For architectural visualization for planning, clarity and relevance matter more than visual complexity.
| Format | Useful for communicating | Limitations |
|---|---|---|
| Annotated elevation | Façade design, openings, roof form and dimensions, with labels to direct attention. | Shows a flat view, so it may not explain depth or how the proposal sits in its surroundings. |
| Contextual 3D view | The proposal’s massing and position in relation to the site and nearby buildings. | May offer less detail about exact dimensions or construction information than technical drawings. |
| Rendered perspective | How proposed materials, colour and spatial relationships may appear from a chosen viewpoint. | Can imply a level of finish or specification that is not settled, and does not replace measured drawings. |
Annotated drawings and contextual 3D views
An annotated elevation can make design features easier to find and compare. Labels might identify a proposed entrance, window arrangement or roofline, while the drawing provides a clear elevation of that face. Its dimensions and geometry should align with the wider design information.
A contextual 3D view adds depth. It can help a reader understand how an extension meets the original house or how a new building relates to neighbouring properties. Use it alongside relevant plans and elevations, not instead of them. The visual explains the proposal; the technical drawings provide measured detail.
Rendered images, video and walkthroughs
A rendered perspective can help when the planning question concerns appearance: for example, how a proposed finish may sit alongside existing materials, or how a change in roof form reads from a particular direction. Keep the level of detail proportionate. If a simple view answers the question, extra effects may distract rather than clarify.
Video or a digital walkthrough can show a sequence of views or help communicate movement through a proposed space. These are optional communication formats, not automatic planning application requirements. Review the relevant local planning authority’s current validation guidance before preparing submission material. The appropriate format depends on the proposal, intended audience and planning context.
How to prepare architectural visualisation for a planning submission
A clear process keeps the image tied to the design and the planning question it needs to explain. Treat visualisation as part of the wider application work, coordinated with architectural design and CAD information rather than prepared in isolation. These steps help turn project details into a considered visual that can be checked against the proposal.
Define the planning question and assemble accurate inputs
Step 1: Identify the point to communicate. Decide what each view should help someone understand. It might show how an extension relates to the original house, how a roof form appears from the street, or how a new home sits within its plot. Consider who will use the image, whether a homeowner reviewing the design or people assessing the application.
Step 2: Bring the source information together. Assemble the current design brief, agreed drawings, site photographs and relevant context information. Include the proposed layout, elevations and details that affect the view, such as boundaries or neighbouring buildings. When these inputs align, there is less risk that the visual will suggest a different scheme.
Step 3: Separate decisions from assumptions. Record which design features are settled and which still need review. For example, don’t present an unselected material as a confirmed specification. Flag uncertain context for the design team to resolve before showing it as fact. This gives the visualisation process a reliable brief and a clear scope.
Review visuals before they accompany an application
Step 4: Check against the latest agreed drawings. Compare the image with the current design information. Confirm that the building’s geometry, openings, roof shape, materials and position match. Check the viewpoint too: it should reveal the relevant relationship with the site, not distort or hide it. If the drawings change, revise the visual before sharing it if needed.
Step 5: Prepare the image for clear reading. Use a concise caption that identifies the view or viewpoint. Keep labels legible and avoid edits that remove relevant surroundings or make the proposal appear materially different from the agreed design. For architectural visualization for planning, a polished image is useful only when it remains an accurate representation.
Step 6: Check local submission guidance. Validation requirements can vary between planning authorities and application types. Review the current guidance for the relevant London borough or Cambridge-area authority to establish which documents and visuals are expected for your project. Don’t assume a particular format is mandatory, or that an illustrative image replaces a required drawing.
For a coordinated approach from design information to planning visuals, explore Oneoff Design’s residential planning support.
How Oneoff Design brings planning visualisation into residential design
For a residential project, a visual is strongest when it grows from the design rather than being added at the end as decoration. Oneoff Design brings architectural design, CAD drafting, 3D visualisation and planning support together in a bespoke process. Each element has a distinct role: the design establishes the proposal, CAD information records its geometry, and visualisation helps communicate how it may appear in context.
A joined-up process from design intent to planning material
The brief sets the direction. It identifies what you want to change, the qualities the design should retain and the questions that are hardest to explain. As the design develops, CAD drawings provide a technical reference for the proposal, while a tailored visual can make its form, scale or relationship with the site easier to understand. Coordinating these elements helps the different materials present a consistent scheme.
That’s the practical role of architectural visualization for planning: communicate design intent clearly while keeping illustrative views aligned with technical information. Visuals can support an application, but they don’t determine its outcome. The documents needed depend on the proposal and relevant planning authority guidance, so prepare the image as part of a considered submission rather than treating it as a shortcut.
For more on how measured technical information supports a home project, read the architectural CAD draughting guide. For broader application context, see the London planning permission guide.
What to prepare before discussing your project
You don’t need to arrive with every design decision resolved. A few clear starting points can make the first project discussion more focused:
- Site photographs showing the house, garden, boundaries and nearby context.
- Existing plans or drawings that help establish the current layout and building form.
- A short description of the proposed changes, such as an extension, alteration or new home.
- Your key questions, especially any design relationship or planning concern that feels difficult to explain.
These inputs help establish what information is available, what needs developing and where a visual may add clarity. The next step can then be tailored to the project, linking design intent, CAD information and planning material without implying that an image can guarantee permission.
If you’re considering a residential project, discuss your design and planning needs with Oneoff Design.
Make your planning presentation clear and considered
Effective architectural visualization for planning is not decoration or a shortcut to permission. It is a clear, context-aware way to communicate design intent, working alongside technical drawings rather than replacing them. The right format depends on the proposal and the question the image needs to answer.
Keep visuals faithful to the latest agreed design, and check the relevant planning authority’s guidance for application requirements. When design, CAD information and visual material are coordinated, it is easier to present a coherent residential proposal.
Oneoff Design brings bespoke residential architectural design and CAD drafting together with 3D visualisation and planning application support. If you’re ready to explore the right approach for your home in London, Cambridge or elsewhere in the UK, discuss your residential design and planning project with Oneoff Design.
Frequently Asked Questions
Does architectural visualisation help with planning permission?
Yes. A well-chosen visual can help planning officers and other readers understand how a proposed extension or new home may look in its setting, particularly when plans alone leave spatial relationships unclear. It supports, but doesn’t replace, technical drawings and written information. Its value is clearer communication of design intent. The planning authority assesses the application against relevant policies and evidence, so a visual cannot determine the outcome.
Are 3D renders required for a planning application in the UK?
There isn’t one answer for every application. Whether a 3D visual is requested or useful depends on the proposal and the local planning authority’s current validation guidance. Check the council responsible for the site, including the relevant London borough or Cambridge-area authority, before preparing submission material. A render should accompany required plans, elevations and supporting documents. Don’t assume a render is mandatory or sufficient on its own.
What is the difference between a planning drawing and an architectural visualisation?
A planning drawing communicates technical information, such as a building’s layout, dimensions, position or elevations. An architectural visualisation illustrates how the proposal may appear, often in three dimensions and within its surroundings. Each has a different purpose. A render can make design intent easier to picture, but it doesn’t provide all the measured detail of a drawing. An application may need both, depending on the project and the authority’s guidance.
Can a planning visualisation show how an extension will look next to neighbouring homes?
Yes. A contextual view can place the proposed extension alongside neighbouring homes, boundaries and other relevant surroundings. Its usefulness depends on accurate design information and a viewpoint that shows the relationship clearly. Site photographs and current drawings can help inform the visual. Represent the context fairly rather than omitting features that affect how the proposal is understood. The image remains illustrative, not a substitute for technical drawings.
What information is needed to create architectural visualisation for planning?
Useful starting material includes the current design brief, existing plans, proposed drawings and photographs of the site. Information about boundaries, neighbouring buildings and the intended viewpoint can also help shape a relevant image. Identify which design details are agreed and which remain undecided, so the visual doesn’t present assumptions as confirmed choices. For projects in Cambridge or London, review the relevant authority’s guidance to understand how a visual fits the application.
Can architectural visualisation guarantee planning approval?
No. A visualisation cannot guarantee planning approval or override planning policy. It can help explain a design, its scale and its relationship with the site, but the local planning authority makes its decision by assessing the application and relevant evidence. Treat the image as one communication tool within a complete submission. Keep it consistent with the drawings and check the authority’s current application guidance for the documents required for your project.
Should I use a render or an annotated elevation for planning?
Choose according to what you need to communicate. An annotated elevation can direct attention to façade features, openings and roof form, while a rendered view can help readers picture materials or the proposal in context. Neither automatically replaces the other, and technical drawings may still be needed. The best format depends on the design question, intended reader and application context. Check local validation guidance before deciding which visuals to include.


